Registration and Spatial normalization of DTI Volumes
Overview
In this section, we describe how the core functionality, the spatial normalization pipeline, is supported by the toolkit. The spatial normalization pipeline includes the following five steps:
- Preprocessing of the input DTI volumes
- Bootstrapping the initial DTI template from the input DTI volumes
- Rigid alignment with template refinement
- Affine alignment with template refinement
- Deformable alignment with template refinement
On this page, we will first go through each of these steps in detail.
A practical example with illustrations is given at the very end of the tutorial. This example is a must read. It gives all the steps that you need in most standard scenarios.
Components of Spatial Normalization Pipeline
Step 1: Before Proceeding ...
- Read the instructions for the necessary preprocessing of DTI Volumes
- Store all the properly-preprocessed subject DTI volumes in one single directory.
Step 2: Bootstrap the initial DTI template from subject DTI Volumes
In general, bootstrapping a population specific template from your cohort of study is the best way to achieve the optimal spatial normalization. This step describes a procedure to bootstrap the initial template which will be refined in the subsequent steps.
There are two available options. Option 1 relies on an existing tensor template while option 2 does not. Option 1 is much more reliable than Option 2 but it requires a tensor template of the same species and similar physical size.
Option 1: Bootstrap with the help of an existing tensor template
What do you need?
- A text file with a list of the filenames of the subject volumes, in the same directory as the subject volumes (see here for example). Make sure the files with the nii.gz suffix. In the example command below, the text file is named subjs.txt.
- An existing tensor template.
- For human subjects (10 years old or older), the template that serves this purpose well is the IXI aging template. You may wonder why an aging template can be used for subjects with a much broader age range. This is because it is used to serve a very restricted role: to ensure that our final template is located and oriented in space in a manner consistent with the standard template spaces, such as MNI. It will not have any influence on the size and the shape of the final template.
- The installation of the template is straightforward: just move the .tgz package to a directory of your choice and uncompress it. The template we need is under the template directory and called ixi_aging_template.nii.gz. In the example command below, the directory I used to uncompress the template is /home/huiz.
Once you are in the subject directory, the following command estimates the initial bootstrapped template:
dti_template_bootstrap /home/huiz/ixi_aging_template/template/ixi_aging_template.nii.gz subjs.txt
Remember to use the path to the template for your system and the text filename of your list of subjects.
Quality Control: Make sure you visually inspect your template at this point to ensure it is desirable before proceeding.
When using this option, Step 3 should be skipped.
Option 2: Bootstrap without an existing template
First, manually select a subset of subjects (5 or so) with good alignment among them, then create a text file like subjs.txt but contain just your chosen subjects and name it subset.txt.
Next, create the initial bootstrapped template with the command
TVMean -in subset.txt -out mean_initial.nii.gz
Finally, resample the template into a voxel space with the voxel dimensions being powers of 2. We recommend to use 128 and 128 for the medial-lateral and posterior-anterior dimensions, and 64 for the inferior-superior dimensions. Choose the voxel size such that the brain covers most of the bounding box defined by the voxel space but leave 2 to 3 voxels gap to each side of the bounding box. The command to use, with the typical voxel space setting for human brains, is
TVResample -in mean_initial.nii.gz -align center -size 128 128 64 -vsize 1.5 1.75 2.25
Step 3: Rigid Alignment of DTI Volumes
Rigid alignment aims to find a rigid transformation, a linear transformation that does not alter objects size and shape, that best aligns two objects in question. Here we describe three different usage scenarios, including
- Case 1: registering two image volumes
- Case 2: spatial normalization a set of images with population-specific atlas
- Case 3: spatial normalization a set of images with some existing atlas.
Case 2 is the most optimal for the purpose of doing population-based group comparison studies.
Case 1: The command for rigidly aligning one DTI volume (the subject) to another (the template) is dti_rigid_reg. You can learn about the usage of the command by doing the following:
The output from the command will be
Rigid alignment of a DTI volume (the subject) to a DTI template
Usage: dti_rigid_reg template subject SMOption xsep ysep zsep ftol [useInTrans]
So you need to provide as input
- template: the filename of the template
- subject: the filename of the subject
- SMOption: the similarity metric you'd like to use for assessing the quality of alignment
- {x,y,z}sep: the distance between the sample points in the volume for the evaluation of image similarity (mm)
- ftol: the minimum amount of change in the cost function as a fraction of the previous value at the previous iteration for the registration optimization to stop
- useInTrans: the optional input to specify whether to initialize with some previously determined transformation.
The output from this command includes the registered image and the transformation that achieves the alignment. If we denote the filename of the subject as ${prefix}.nii.gz, then the filename of the registered image will be ${prefix}_aff.nii.gz and that of the transformation will be ${prefix}.aff.
Here is an example usage:
dti_rigid_reg template.nii.gz tensor.nii.gz EDS 4 4 4 0.01
The command registers tensor.nii.gz to template.nii.gz using a similarity metric known as EDS, i.e., Euclidean Distance Squared. The distances between adjacent sampling points are 4mm along x, y and z directions. The registration optimization will be stopped when the change between consecutive iterations is less than 1%. The output will be tensor_aff.nii.gz and tensor.aff.
The useInTrans option is put in place specifically to significantly reduce computation time when iteratively bootstrapping template. After registering all the subjects to your initial bootstrapped template for the first time, the estimated transformations can then be used subsequently to initialize the next round of registration to the improved template. Besides the obvious benefit of reduction in runtime, initialization becomes critical when moving onto the affine alignment. The appropriate command becomes:
dti_rigid_reg template.nii.gz tensor.nii.gz EDS 4 4 4 0.01 1
In addition to EDS, additional similarity metrics include DDS (Deviatoric Distance Squared), and GDS (Geometric Distance Squared).
Case 2: In practice, in the context of spatial normalization, the goal is to align a set of DTI volumes. In this case, the more appropriate command is dti_rigid_population. It improves the alignment of the volumes by iteratively refine the template. You can learn about its usage by typing the command without any arguments. Below is a typical usage example:
dti_rigid_population template.nii.gz subjs.txt EDS 3
which takes template.nii.gz as the initial template and rigidly aligns the subjects specified in subjs.txt using the EDS as the similarity metric. The template will be iteratively optimized for 3 times over the whole process. The program outputs a number of files. The optimized templates will be saved as mean_rigid{1,2,3}.nii.gz. The file mean_rigid0.nii.gz is a copy of the initial template. The aligned volumes are computed and their filenames are stored in "subjs_aff.txt". The computed transformations are also saved using the naming convention described in Option 1.
Case 3: If you need to re-run the rigid alignment with an existing optimized template, an alternative command to use is dti_rigid_sn, which simply aligns the subjects to the template wihout optimizing the template. A typical usage is as follows:
dti_rigid_sn template.nii.gz subjs.txt EDS
Quality Control: Make sure to visually inspect the aligned images and the refined template. There is always a chance some random image may get registered incorrectly. When this does happen, you can try alternative similarity metrics.
Step 4: Affine Alignment of DTI Volumes
Affine alignment improves upon rigid alignment by finding a more general linear transformation that allows objects' global size and shape to be altered. Because affine alignment, just like rigid alignment, is looking for a linear transformation, albeit a more general one, the corresponding commands are designed and behave exactly the same as the ones for rigid alignment. The equivalent commands for the three cases are (1) dti_affine_reg, (2) dti_affine_population, and (3) dti_affine_sn.
You can learn about their usages by going through the ones described for their rigid counterparts.
Because the linear transformation estimated using the rigid alignment provides a good initial estimate to the affine alignment, the affine alignment naturally follows the rigid alignment in our spatial normalization pipeline. We have developed all the affine alignment programs to support this initialization process as easy as possible. We achieve this by using the same naming convention for the solution linear transformations. As an example, for a volume called "tensor.nii.gz", after the rigid alignment, the solution transformation will be stored in a file named as tensor.aff and the warped volume will be stored as tensor_aff.nii.gz. When running the subsequent affine alignment using either the option (2) or (3), the programs will initialize the transformation with tensor.aff. However, the program will still proceed if tensor.aff does not exist. It will lead to longer computation time and potentially less optimal alignment. If you use the option (1), you can use the flag useTrans to explicitly specify if you want to initialize with tensor.aff or not.
Step 5: Deformable Alignment of DTI Volumes
After you've aligned your DTI volumes affinely, you can proceed with the deformable alignment, which is designed to improve alignment quality by removing size or shape differences between local structures. Currently, the program is implemented such that it requires the warped volume after affine alignment. With the example that we have used throughout, it will be the file called tensor_aff.nii.gz. In the future, we will improve our implementation such that the input will be tensor.nii.gz and tensor.aff. Below we will describe the same three scenarios as the ones described for the Rigid Alignment.
Case 1: The command for deformably aligning one DTI volume (the subject) to another (the template) is dti_diffeomorphic_reg. You can learn about the usage of the command by doing the following:
The output from the command will be
Deformable alignment of a DTI volume (the subject) to a DTI template
Usage: dti_diffeomorphic_reg template subject mask initial no_of_iter ftol
The required input are
- template: the filename of the template
- subject: the filename of the subject
- mask: the filename of a binary image that has 0 for background voxels and 1 for brain tissue voxels
- initial: a legacy parameter, just set to 1
- no_of_iter: number of iterations, recommended value to use is 6
- ftol: the minimum amount of change in the cost function as a fraction of the previous value at the previous
- iteration for the registration optimization to stop, recommended value is 0.002
The output from this command includes the registered image and the transformation that achieves the alignment. If we denote the filename of the subject as ${prefix}_aff.nii.gz, then the filename of the registered image will be ${prefix}_aff_diffeo.nii.gz and that of the transformation will be ${prefix}_aff_diffeo.df.nii.gz which is stored using the NIfTI vectorial format.
Here is an example usage:
dti_diffeomorphic_reg template.nii.gz tensor_aff.nii.gz mask.nii.gz 1 6 0.002
A simple way to generate the mask image is to use the following commands:
TVtool -in template.nii.gz -tr
BinaryThresholdImageFilter template_tr.nii.gz mask.nii.gz 0.01 100 1 0
which first compute the trace map of the template image, then binary threshold the trace map to generate the mask image. For this to work, it is important that 1) the subject image has already affinely aligned to the template, 2) the diffusivity unit has been adjusted according to the description here.
Caution: Check that the mask image produced makes sense. The mask image should have a value of 1 for the voxels within the brain parenchyma and 0 outside. Make sure that none of the voxels in the top two and bottom two slices take the value 1. If this is not the case, please use software like ITK-SNAP to edit the mask to meet the requirement.
Case 2: The command for spatial normalization with population-specific atlas is dti_diffeomorphic_population. It improves the alignment of the volumes by iteratively refine the template. You can learn about its usage by typing the command without any arguments. Below is a typical usage example:
dti_diffeomorphic_population template.nii.gz subjs_aff.txt mask.nii.gz 0.002
which takes template.nii.gz as the initial template and deformably aligns the subjects specified in subjs_aff.txt (by convention, this file stores the files that have been affinely aligned). The template will be iteratively optimized for 6 times over the whole process. The program outputs a number of files. The optimized templates will be saved as mean_diffeomorphic_initial1,2,3,4,5,6.nii.gz. The file mean_diffeomorphic_initial0.nii.gz is a copy of the initial template. The aligned volumes are computed and their filenames are stored in "subjs_aff_diffeo.txt". The computed transformations are also saved using the naming convention described in Option 1.
Case 3: If you need to re-run the deformable alignment with an existing optimized template, an alternative command to use is dti_diffeomorphic_sn, which simply aligns the subjects to the template wihout optimizing the template. A typical usage is as follows:
dti_diffeomorphic_sn template.nii.gz subjs_aff.txt mask.nii.gz 6 0.002
An example of using the spatial normalization pipeline
This example illustrates all the individual pieces described above in a practical example of normalizing a set of DTI volumes.
Step 1: Preprocessing
Preprocess of all the subject DTI volumes and create the file subjs.txt
Step 2: Bootstrap the initial template mean_initial.nii.gz
dti_template_bootstrap /home/huiz/ixi_aging_template/template/ixi_aging_template.nii.gz subjs.txt
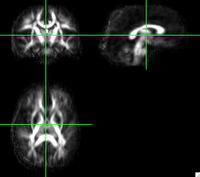
The figure below shows the FA map of the initial bootstrapped template.
Step 3: Affine Alignment with the final refined template estimate from rigid alignment:
dti_affine_population mean_initial.nii.gz subjs.txt EDS 3
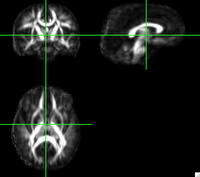
The figure below show the FA map of the final refined template after affine alignment. The improvement over the initial template is evident.
Step 4: Deformable Alignment with the final refined template estimate from affine alignment:
TVtool -in mean_affine3.nii.gz -tr
BinaryThresholdImageFilter mean_affine3_tr.nii.gz mask.nii.gz 0.01 100 1 0
Really important to check that the mask is appropriate before embarking on the next most time-consuming step. Make sure none of the voxels in the top two and bottom two slices fall within the mask. If this is not the case, please use software like ITK-SNAP to edit the mask to meet the requirement.
dti_diffeomorphic_population mean_affine3.nii.gz subjs_aff.txt mask.nii.gz 0.002
The figure below show the FA map of the final refined template after deformable alignment. Compared to the affinely refined template, this template has distinctly crisper cortical features.
Finally, the figure below illustrates a typical DTI template produced using DTI-TK.